
Ever feel like your wall could use a little extra spark? Building a gallery wall is like setting up your very own mini art show at home. In this guide, we'll explore how gathering special photos and artwork can transform any room into a stylish, welcoming space. You'll find easy tips, from picking that perfect standout piece to arranging smaller accents that tie everything together. Imagine turning a plain wall into a feature that truly reflects your unique style and taste.
Step-by-Step Guide to a Stylish Gallery Wall
Start by picking a style that really speaks to you. Gather art, photos, and decorative accents that share a similar vibe, like pairing vibrant vintage postcards with soft botanical prints to create a harmonious look.
Next, choose one special piece to be your anchor. Think of it as the statement accessory that ties everything together. This standout artwork sets the tone for your entire display.
Before you put any nails in the wall, try the layout out first. Lay your pieces on the floor or mark the spots with painter’s tape. It’s like trying on an outfit before you head out, you want to make sure the spacing (around 2–3 inches between frames) and balance feel just right.
After you’re happy with the arrangement, add a few extra touches. Consider small shelves, a few delicate plants, stylish mirrors, or even a unique sculpture. These accents bring depth and a personal flair to your gallery wall.
Finally, secure your artwork using a laser level, tape measure, and proper hardware. Take your time to align everything perfectly for a neat, stable finish.
Planning and Layout Strategies for a Stylish Gallery Wall
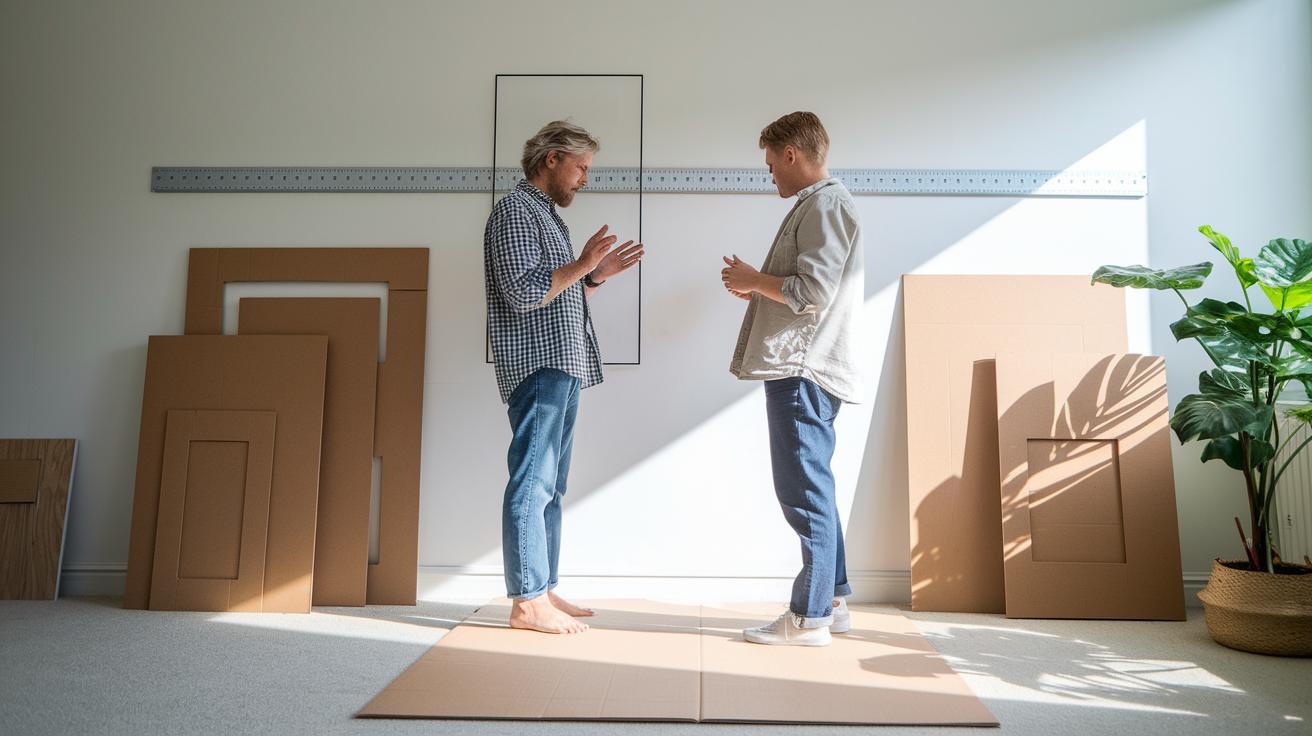
First, grab a measuring tape and check your wall space. Mark a centerline at around 57-60 inches from the floor, that way, your art hangs at a perfect, comfy height. It’s like setting the stage for a great conversation with your favorite picture.
Next, cut pieces of cardboard or paper to match your frame sizes. Lay them on the floor or lightly stick them to the wall and play around with different arrangements. Keep about 2–3 inches between each piece so everything feels neat and balanced, like a well-curated outfit.
Remember to think about any furniture or architectural details nearby so your display doesn’t get too crowded. Mix a bold, big piece with a few smaller ones, and you’ll create a charming look where every artwork sings without stepping on another’s toes.
When you’re happy with your design, it’s time to hang your pieces. Use a stud-finder or sturdy wall anchors for the heavier frames. Treat your floor layout like a fun test run that makes the final hanging process smooth and just right.
Selecting Frames and Art for a Stylish Gallery Wall
Begin with a clear vision. Pick a color mix that feels balanced, imagine soft neutrals like beige and gray paired with pops of navy or gentle hints of muted gold. It’s like choosing the perfect accessory that brings your whole look together.
Mixing different frame materials can really brighten up your display. Try combining the warm touch of wooden frames with sleek metal or modern acrylic ones. Stick to about three different styles to keep your gallery looking thoughtful and chic. For instance, a lucite frame works wonders for playful pieces like children’s art, while a crisp white frame perfectly highlights a black-and-white photograph.
Consider the sizes of your artwork too. Small pieces can serve as charming details that capture special memories, while medium prints weave a visual story. Picture a tiny vintage portrait sitting next to a bold botanical print, an arrangement that starts a conversation, much like a well-curated accessory collection.
In the end, this mix of frames and art doesn’t just create a display, it weaves a personal tale of style and taste that lifts any space.
Mixing Frame Styles and Art Orientations for a Stylish Gallery Wall
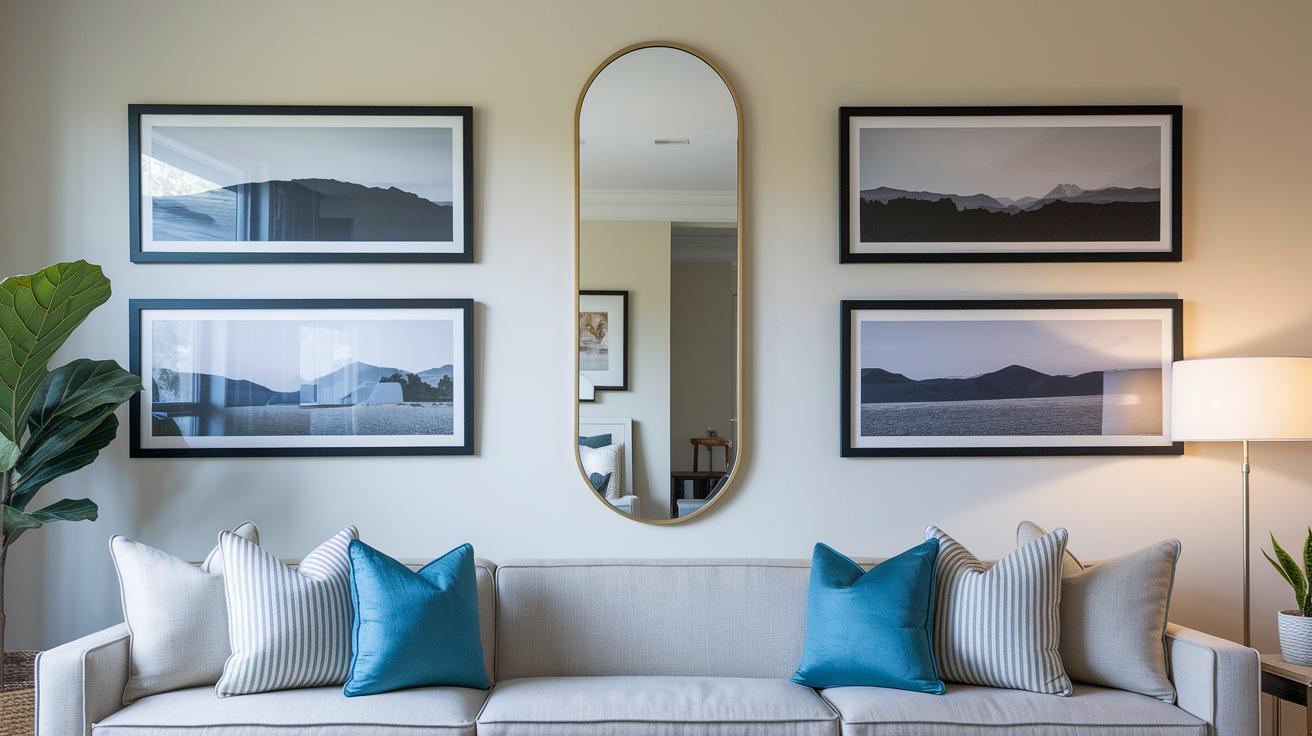
Mix up your frame styles to give your wall some life and flair. Try placing horizontal art next to vertical pieces so your display never seems flat. For instance, you might hang a long, landscape print beside a tall, portrait piece to add a playful twist. You could also pair two similar items side by side, like matching fabric swatches, to instantly create a cozy sense of harmony.
Next, add some extra depth by mixing in sculptural objects, textiles, or even a mirror. Picture a sleek mirror tucked between two art prints, catching the light and offering a fresh, unexpected touch. It’s super fun to break away from a strict grid with unique shapes like oval canvases or quirky fabric pieces. By blending different finishes and materials, you can strike a delightful balance between neat order and spontaneous style, making your gallery wall truly one-of-a-kind.
Hanging Techniques and Spacing Guidelines for a Stylish Gallery Wall
Start by outlining your artwork on the wall using painter’s tape. This lets you play with different placements and keep a neat 2–3 inch gap between each frame, almost like laying out your favorite outfit before stepping out. Try taping shapes that match your frames, then step back to check the balance.
Next, grab a laser level to double-check that each piece is perfectly aligned. Think of it as making sure every accessory on your outfit is just right.
When you’re ready to hang your frames, choose mounting hardware based on their weight. For lighter pieces, picture-hanging hooks work well, and for heavier ones, drywall anchors add that extra support. It’s smart to use keyhole or D-ring hooks to keep your wall smooth and free of extra marks. Using D-ring hooks, for example, not only secures your art but also keeps your wall looking clean.
Coordinating Color Palettes and Textures for a Stylish Gallery Wall
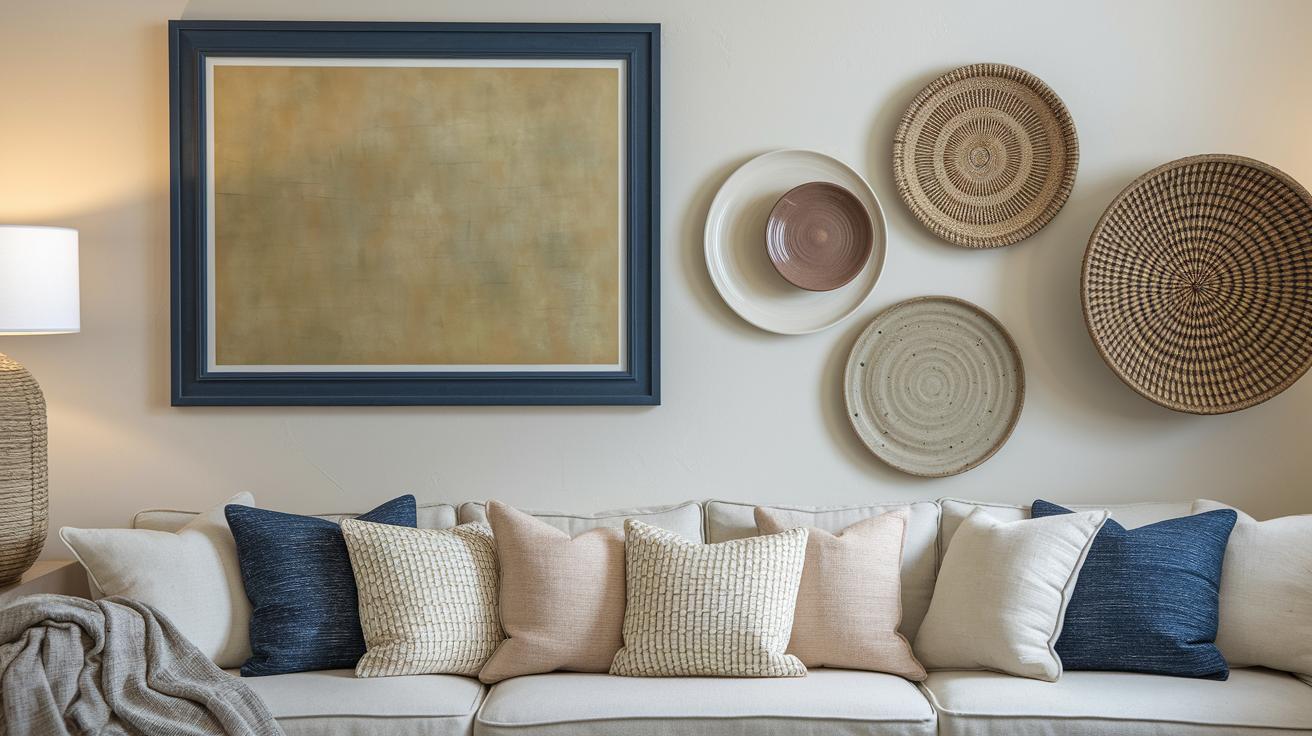
Build your gallery wall with a smart mix of colors and textures that naturally complement each other. Start with a clean base by pairing neutral tones like beige, gray, and white with occasional splashes of navy or soft, muted gold. Picture a gallery wall where a creamy backdrop suddenly feels more dynamic thanks to a bold navy frame. Imagine a striking graphic print in muted gold sitting perfectly alongside simpler, solid pieces, it’s an effortlessly chic look.
Layering is your go-to trick for adding depth. Bring in some three-dimensional charm with items like woven baskets, ceramic plates, or shadowboxes. A handy tip: introduce one textured element at a time. For instance, try a rough, tactile woven basket next to the smooth shine of a ceramic plate. It’s a bit like pairing a chunky bracelet with a sleek band, mixing contrasts that instantly draw the eye.
Switching between matte and glossy finishes in your frames or artwork gives a cool play of light. A matte frame set against a glossy canvas can energize your display without stealing the spotlight. And remember, keep patterns to a minimum. A single patterned piece among mostly solid works keeps the look clean and balanced.
For more inspiration, explore texture and layering tips for creating stylish interiors. They’re full of creative ideas to help you mix tactile elements in your gallery wall with confidence and flair.
Budget-Friendly and DIY Tips for a Stylish Gallery Wall
Ever been on the hunt in a thrift store? Check out flea markets and online deals too for frames and artwork that match your vibe and save some cash. It’s like finding a hidden gem that adds charm to your space without breaking the bank.
Why not reuse some of your favorite photos or free printables by putting them in clip frames or even creating your own float mounts with foam board (a simple, cushioned backing for your prints)? Give an old family snapshot a fresh look using this DIY foam board trick for a really polished finish.
Sometimes, a quick makeover is all you need, try painting those mismatched frames in the same color. It brings a neat, unified look to your gallery, much like mixing accessories for a flawless outfit.
Mix things up by pairing store-bought art with handmade creations like embroidered hoops or pressed flowers in tiny glass vials. A friend once said it’s like blending a boutique find with a heartfelt keepsake, making your gallery wall uniquely yours while keeping your budget in check.
Final Words
In the action, we explored a clear roadmap for building a striking gallery wall. We covered everything from layout planning and frame selection to dynamic hanging techniques and budget-friendly DIY tips. Each step helps you create a polished look using a simple mix of styles and textures. Whether you’re experimenting with spacing or coordinating colors, these ideas put you in charge of your space. Embrace the process and remember, this guide shows how to create a gallery wall for a stylish interior that truly lights up any room.
FAQ
What is a gallery wall layout generator?
A gallery wall layout generator is a tool that helps you plan your arrangement before hanging. It lets you experiment with different placements and sizes so the final display looks balanced and chic.
How can I create a gallery wall for a stylish interior easily?
Creating a stylish gallery wall is about measuring your space, selecting a standout piece as the anchor, and arranging photos or art using simple planning tools or paper cutouts to perfect the layout.
How do I create a gallery wall with family photos?
Creating a gallery wall with family photos means choosing a common theme and frame style, aligning your photos for a unified look, and using layout tools to ensure the arrangement flows beautifully.
Are there free gallery wall layout generators available?
Free gallery wall layout generators let you test different design options without extra cost. They enable you to arrange various frame sizes and placements digitally before you commit to hanging.
What gallery wall rules should I follow?
Key gallery wall rules include maintaining a 2–3 inch gap between frames, centering the display at an optimal height, and ensuring a cohesive mix of frames and art that matches your interior style.
How can I design gallery wall layouts with proper sizes?
Designing gallery wall layouts with proper sizes involves measuring your wall carefully, planning with cutouts or tools, and balancing small and larger pieces to create a visually harmonious display.
What is a gallery wall design tool?
A gallery wall design tool acts like a virtual planner, allowing you to try different frame placements, sizes, and spacing options so you can visualize your final layout with confidence before installation.
